.
Seems hard to believe, but this blog is about to enter its fifth year of "publication". I initiated Light Description as a means to learn about blogging and to force myself to be more disciplined and organized in my thinking about photography. Along the way, I found that participants in photography discussion forums often ask the same questions over and over. This blog has become a convenient way to answer those repetitive forum questions in more detail with less typing. Of course, Light Description is also a platform for showing the occasional good picture that I get as well as griping when things or equipment are not to my liking. For all these reasons, I like my blog.
Light Description really picked up when I got my Canon G9; in fact, to some viewers, Light Description is the "G9 Blog". Now that I have a G12, I suppose Light Description will become the "G12 Blog". Actually, my best camera is the Canon 7D but I take the most pictures and have the most fun with the G9 and G12. In fact, I bought a G6 not long ago just to see how it filled in those gaps between my G3 and G9.
A few statistics: Last year, Light Description has 46974 visits from 35407 unique visitors for an average of 129 daily visits. Visits typically run between 100 and 200; the peak was 337 visits in one day. Visitors average reading two posts before exiting. Most visitors are from the USA, UK, Canada and Australia but the list includes 156 countries! Most traffic to Light Description is generated by search engines but nearly the same amount is generated by direct referrals from other sites.
The most popular posts on Light Description are:
1. Yongnuo Speedlite YN460-II
2. G12 and G9 in Noise Modes
3. G12 Lens Adapters
4. G12: Going Wide
Plans for the future include, well, more of the same. I'm still learning the ins and outs of the G12 and have a few new gadgets to report on as well. I'm anxious to learn more about video on both the G12 and 7D; frankly, video is a bit intimidating.
Light Description is completely non-commercial and almost certain to remain so. The various cameras, accessories and gadgets that I report on have been purchased with my own funds for my own use. Obviously, I am not a professional photographer or blogger.
Thanks for reading Light Description. Stay tuned in 2011 but don't forget to use the labels and search function to find useful information from previous posts.
.
Friday, December 31, 2010
Thursday, December 30, 2010
G12: HDR Mode
.
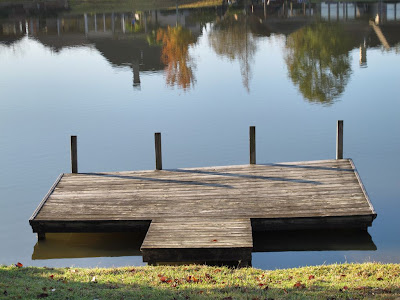
From time to time, I like to tinker with High Dynamic Range (HDR) photos. In the past, HDR, for me, has meant taking at least three photos at varying exposures and combining those images in software such as Photomatix. The combination is then further edited in either Photomatix and/or Photoshop. The G12 has a built-in HDR mode; that is, HDR is included as one of the Scene (SCN) modes. I'd previously tried G12 HDR and didn't care too much for it but decided to give it another try.
G12 HDR is somewhat tersely described on page 71 of the G12 manual. Basically, you select HDR from one of the SCN options, choose a “Color Effect”, secure the G12 on a tripod and fire away. That's right, you do not select ISO, aperture or shutter speed. The G12 takes three shots and combines them. The three component shots are not saved; only the combination is saved.
For the above shot, I choose to turn the HDR color effect off because my goal was a more or less normal photo with, hopefully, improved dynamic range. Immediately after getting the HDR shot, I used bracketing to get three more normal shots in RAW+JPEG mode. The “correctly exposed” JPEG is shown below.
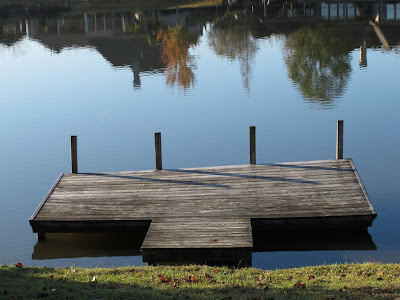
Next, I used Photomatix to generate a 32 bit HDR file and used the Photomatix Tone Compressor to make the “HDR” image below.

Finally, using the more drastic Tone Mapping produced the “HDR” image below (although not a particularly wild variation).

None of the above are particularly "right" or "wrong" -- it's all a matter of taste and being able to use technology to consistently achieve your goal. I haven't quite achieved consistency but have learned that I usually prefer the more modest "Compressor" results of HDR.
All HDR photos are not created equal and some are not even very good. Whereas my early interest in HDR tended to generate unrealistic images, my current approach is to produce more natural images with extended range. Not to say that I will never use the G12 HDR mode but my preference is still to do HDR using the more difficult, but more flexible, process.
.
Wednesday, December 29, 2010
G12 Bug: Self Timer Shutter Delay with Wireless Remote
.
Another flash related bug has shown up on the G12. Previously, I griped about the “screen blanking” that occurs when using a (non-Canon) wireless remote to trigger an off-camera flash. Even though the screen would go dark (indicating the manual exposure) with wireless remotes, at least the flash would be triggered. A recent discussion forum thread pointed out that the flash will not be triggered if the internal self timer is used to produce a shutter delay.
I tested my own G12 using Yongnuo RF-602 wireless remote triggers connected to off-camera Canon flashes. The RF-602 triggered the flashes (although the screen went blank) as expected unless the G12 self timer was used to delay the shutter.
The problem was also reported to occur with CyberSync CST remotes.
Apparently the mis-fire does not occur with Canon’s own STE-2 transmitter and Canon flashes.
A work around for self portraits is to add a second RF-602 transmitter and receiver (set to a different channel) along with the Yongnuo shutter connnecting cord LS-02/C1. I did this to get some Halloween pictures.
The G9 does not have this problem – something has changed in the G12 firmware. C’mon Canon, fix our G12s!
.
Friday, December 24, 2010
Using your new G12
.

(I had good intentions of posting this a few days ago but hope it is helpful anyway.)
Here are just a few basics and tips to consider after opening Santa’s gift: The new Canon G12 that you asked for. (Much of this applies to most digital cameras with specifics for the G12.)
Immediately find the battery and charger. Put the battery in the charger and plug in the charger. Although the battery probably has a slight charge already, begin the charging process. You’ll probably be too impatient to let the battery completely recharge but go ahead and add a few electrons now. Full recharge will take a couple of hours.
Unlike previous G series cameras, there is no printed instruction manual; however, there is a printed “Quick Start” guide. The instruction manual is in .pdf format on the CD that contains the Canon software. Install the software while electrons are being added to the battery. If you already have previous versions of the Canon software, Canon recommends that you install the current version over the older version. If you are using Windows XP, be sure to have installed all the available updates (Service Pack 3). Remember to restart the computer.
Unwrap the memory card. Santa did remember that the G12 doesn’t come with a memory card, didn’t he? I’m currently using a Class 6 Transcend 8GB SDHC card but it seems that almost anything will do. Slower cards will work fine but, uh, slower --especially while you wait impatiently for all those bits to be transferred to your computer. If your new memory card came with special software already stored, be sure to copy that software to your computer’s hard drive or a CD.
Flip the G12 upside down to get to the battery and card door on the bottom. Push down on the door and slide it over its catch then let it pop up. Insert the memory card so you don’t lose it while you read the Quick Start guide and wait for the battery to be charged. The memory card and battery can be inserted into the G12 only when properly oriented.
Get accustomed to the G12 and the layout of its controls. Take a look through the viewfinder and, if necessary, adjust the viewfinder optics to suit your vision. Pull out that nice articulated screen, gently flip it around and push it back onto the camera body.

Now that approximately 5 electrons have been added to the battery, go ahead and install it into the G12. Flip the G12 right side up and turn it on with the small button on the top of the camera. In using the G12, you will probably discover that it is easy to accidentally push the wrong button or dial on the back of the camera. You’ll get better at this but it is a problem. Try putting your thumb firmly on the thumb pad next to the button with * on it.
Reformat the memory card using the G12 menu system (page 17 of the Quick Start guide). The Menu button is on the back of the camera. Push it and use the large dial to cycle through the menu commands in amazement until you come to the one that says Format (it’s under the “tools” tab). Just think, soon you will know the meaning of all those options! Push the center button of the large dial on the back of the camera to activate the Format option.
Ready to take a picture (I bet you’ve really already taken one by now)? While you get the feel of the G12, put it in completely automatic mode. This means the green oval “AUTO” on the small top dial on the right hand side as well as the green AUTO on the larger dial beneath it. Rotate the dials to align these green labels with the light grey bar (actually a light). Take your first picture with the G12.
Did you remember to use the “half press” shutter button technique? This is one of the most useful and important techniques for modern cameras because it reduces the effective shutter lag while confirming focus. In fact, I think “Focus” as I do this. Push the shutter button gently and you’ll notice that the “feel” changes as the button goes about halfway down. You’ll probably hear a slight beep and see a green rectangle light up on the LCD. Hold that position momentarily then finish pushing the shutter button to get the picture. The “half press” technique is explained on page 18 of the Quick Start guide.
To do list:
Finish charging the battery.
Set the date and time using the menu system (page 14 of the Quick Start guide).
Get a second battery. The G12 battery is a good one but you’ll want a spare. I use the cheaper clone and get an adapter for charging in the car. Charge and test the clone as soon as you get it.
Get a wrist strap. I use a Gordy strap but there are many others to choose from.
Get a bag. It seems that most G series users opt for a small camera bag that can be mounted on a belt but I use a medium size shoulder bag to accommodate my “stuff”.
Get a real flash. The built-in flash is useful but not very powerful. Such built-ins often cause harsh shadows and red eye. A small, nice external flash is Canon’s 270EX (although I use a larger Canon flash on-camera and favor off-camera flash).
To connect the G12 directly to your HD TV, you need the HCMI cable HTC-100 (or a clone). This cable has a small connector matching the camera receptacle.
The RS60-E3 remote is a nice touch and very helpful.
Eventually, you may want a conversion lens adapter to mount filters or wide angle or telephoto lenses.
Name your camera, see a previous post.
Enjoy your G12. This blog is full of my trials and errors with the G9 and much of those experiences also fit the G12. Use the labels on the left hand side or the search button to find topics of interest to you.
.
Sunday, December 5, 2010
G Series: 1 Second Av
.
The longest shutter speed available for a Powershot G in Av mode is 1 second. There, I've said it. OK, so I'm not 100% sure about this. The G1 or G2 might be different but my G3, G6, G9 and G12 all have this problem -- or feature, depending on how you look at it -- and I've read enough questions and complaints to feel sure that the G5, G7, G10 and G11 are programmed with the same limit. The 1 second limit is not a bug because all the G series have it. Although not a particularly serious problem, the 1 second exposure limit is unexpected -- especially since I typically forget!
Perhaps the 1 second limit is Canon's attempt to save us from ourselves because, of course, we could not hand hold the camera for that duration. But we also could not hand hold the camera for 1/2 second or, after several coffees, even 1/30 second. Plus, the little jiggly camera icon comes on to warn us at slow shutter speeds. Besides, the shutter speed can be set for more than 1 second in Tv or, or course, M modes. Therefore, I suspect that the 1 second limit is an arbitrary one or perhaps a programming convenience.
The vast majority of the time that the 1 second limit in Av mode becomes a problem to me is when I'm making a High Dynamic Range (HDR) photo. To make an HDR photo, I typically mount the camera on a tripod, set the lowest ISO, select Av mode and set a mid-range f-stop. I then use the auto bracketing feature of the camera. The G series auto bracking can be set for 3 shots at +/- 2 stops. When the camera is in Av mode, the "stops" are adjusted by changing shutter speed. As an example, if the "correct" exposure is f5 at 1/60 second then the auto bracketing process produces an underexposed shot at f5, 1/240 and an overexposed shot at f5, 1/15 second. Most of the time, this works out fine; however, if the base case exposure is, say 1/2 second, then the overexposed shot is at 1 second instead of the expected 2 seconds. If the base case exposure is at 1 second then the "overexposed" shot is also taken at 1 second which is not useful.
For purposes of bracketing in Tv mode, remember that the (most recent) G series really has only 4 stops of aperture exposure bracketing: f2.8, f4, f5.6 and f8. Not all of those apertures are available at all zoom settings. Also, for purposes of creating an HDR image, variations in aperture produce variations in focus and depth of field.
As a result of the 1 second exposure limit in Av mode, long exposure HDR sets must be done in manual mode.
Now I can use this post as a reference for anticipated future complaints and explanations.
.
Subscribe to:
Posts (Atom)